So, you want to change your IP address. There are multiple ways to do this with IPVanish; the easy way is simply using the IPVanish app. The more technical approach requires you to manually change your IP address by installing configuration files.
In this post, we’ll provide simple step-by-step instructions for both methods. Here’s everything you need to know about changing your IP address with IPVanish, including a detailed guide on how to manually change your IP address.
The benefits of changing your IP address
Before diving into how to change your IP address, let’s take a brief step back. What are the benefits of changing your IP, anyway?
IP addresses are a core part of the functionality of the modern internet. They are responsible for identifying your device on a network and allowing data to be routed between your device and websites.
While this is essential for seamless connectivity, your IP address can reveal information about your location and online activity. Changing your IP address with a VPN, like IPVanish, offers several compelling benefits:
Enhanced privacy: Every time you visit a website, your IP address is logged, and over time, it builds a profile of your online behavior. By changing your IP address, you make it harder for websites, advertisers, and even internet service providers to track your browsing history.
Location protection: Many websites and online platforms track your geographic location, using it to personalize content or restrict access. If you’re concerned about your digital footprint, changing your IP address with a VPN helps shield your location. By connecting to a VPN server in another region, you can keep your real location private, ensuring that your online activities aren’t easily tied to where you are in the world.
Security against hackers: Hackers can use your IP address to locate your device, opening the door to cyberattacks. By masking your IP, you also add a layer of encryption, making it more challenging for malicious actors to target your device or intercept data. This can be particularly beneficial on public Wi-Fi networks, where the risk of hacking is higher. Additionally, changing your IP address helps limit the data advertisers can collect, reduce invasive tracking, and enhance your security.
Improved online anonymity: An IP address functions like a unique digital identifier that connects your online activity back to you. Masking your IP address by sharing one with other users enhances your online anonymity. This makes it much harder for anyone to trace your activity back to your physical location or personal identity.
Easy VPN setup. Protection in minutes.
Now, let’s discuss how to change your IP address using IPVanish, starting with the easy method.
Change your IP address the easy way: Download the IPVanish app
Before we show you how to manually change IP address data with IPVanish VPN, we want to make sure you know about the easy way first. Usually, it’s best to install the IPVanish app to your device. IPVanish apps are available across the most popular desktop, mobile, tablet, and streaming devices.
See also: How to Change Your VPN Location on Different Devices
If you already have the IPVanish app and want to change IP addresses, you can do that easily by switching server locations in the IPVanish app. Switching the location will automatically give you a new IP address based on the new region.
There are a few cases when you need to set up your IPVanish VPN manually. Let’s discuss how to do that.
Manually change IP address data with IPVanish VPN (the technical way)
Manually configuring a VPN means setting up the VPN connection without using a dedicated app, often by entering specific network details directly into your device’s settings. This approach is typical for devices where a VPN app isn’t supported, like certain Linux distros, routers, or older systems incompatible with current or legacy VPN applications.
You should know in advance: Manually changing your IP address can’t be done without the help of your VPN provider. As you’ll see in the first step, you should expect to contact IPVanish support to accomplish this manual process.
At a high level, here are the steps to manually configure your IPVanish VPN with your router and older OS:
Step 1: Obtain VPN location details from IPVanish
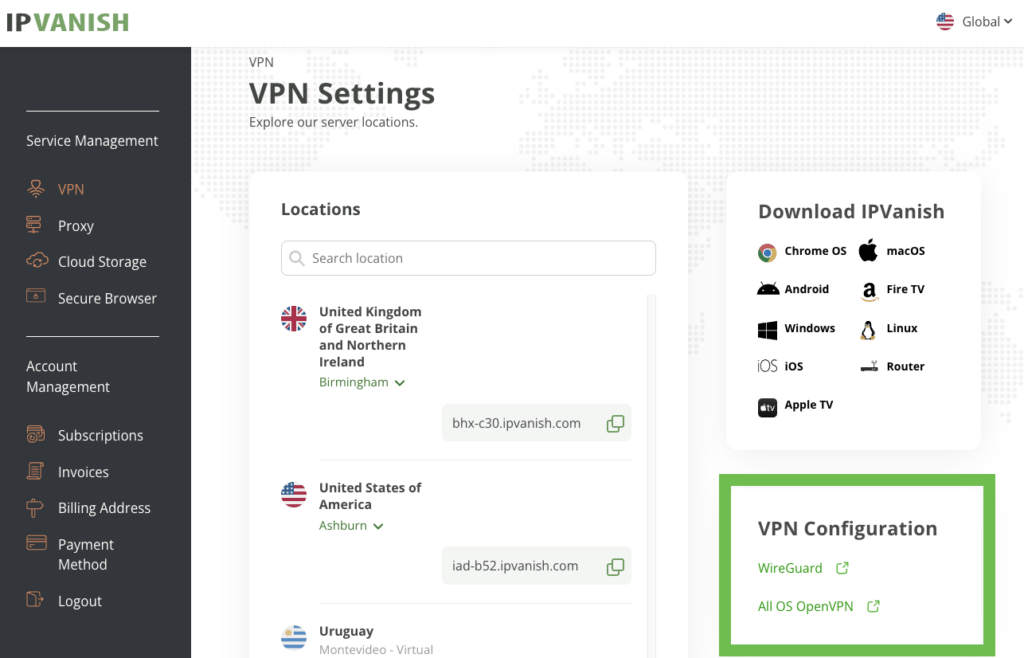
Log in to My Account on the IPVanish website. Once logged in, select VPN from the left-hand menu. On the VPN page, you’ll be met with the list of server locations. Make a mental note of that and locate the VPN Configuration section on the right side. Here, you’ll find the downloadable zip of configuration files for OpenVPN labeled “All OS OpenVPN”

You can also contact the IPVanish Support Team for assistance with this.
Step 2: Enter the details
Once you obtain the manual VPN setup details, you will input them one of two ways:
- Older OS versions (e.g., Windows 7 or macOS 13): Navigate to your network settings. Set up a new VPN connection by manually entering the server details, your credentials, and protocol settings.
- Your router: Log into the router’s admin interface via a web browser and input the VPN settings under the VPN or network tab.
Once you’ve completed the configuration, you should see a new network connection appear in your device’s native settings. Simply activate the encrypted VPN connection to manually change your IP address.
For detailed step-by-step instructions on how to manually change IP addresses with IPVanish, check out our comprehensive setup guides in the Support Center. They cover most devices and VPN connection types, including:
With these resources, you’ll be able to manually change IP addresses with IPVanish and enjoy the added layer of privacy and security.
